


One of the most challenging, rewarding and creative aspects of what I do is the One-of-a-Kind (OOAK) art dolls. Sometimes these are my ideas, sometimes they're commissioned works by someone with a very specific idea in their head. I can only work on these at certain times of the year and have only so much time I can dedicate to them, but boy are they fun!
I thought it might be fun to take you through the general process I go through when working on one of these dolls. I start with lots of photos and questions for the person - a big part of this is establishing and clarifying what aspects of the doll are considered important details of the figure. Without those special details, the client may not feel the doll is representative for them!
Lady Tinkerton was requested by Andy (to protect his privacy I won't give his full name!). I had made him Sir Thomas Nigel Tinkerton just recently, which was essentially his Steampunk character in doll-form.


Of COURSE Sir Thomas was a bit lonely and needed a companion! Andy started by giving me access to whatever photos he had of his wife's character, and secretly took close up photos of some of the more intricate details (this is where we get into the "special details" that make the figure recognizable as such).

For Lady Tinkerton, of course the fingerless gloves, the parasol, goggles and shawl are the big ones!
There of course are other details but those ones Andy had to send me some close up shots of (her hat, jewelry and belt).
For this one, I actually started with another designer's pattern which I had been dying to try out anyhow. It is Follies Showgirl by Arley Berryhill and available on Etsy in the Cloth Doll Patterns shop.
I love having the opportunity to try out patterns by other designers, I ALWAYS pick up on some tricks I've never used before, and really feel like I'm becoming a better designer because I'm not stuck in my old ways of doing things, I'm always prowling around for new methods :)
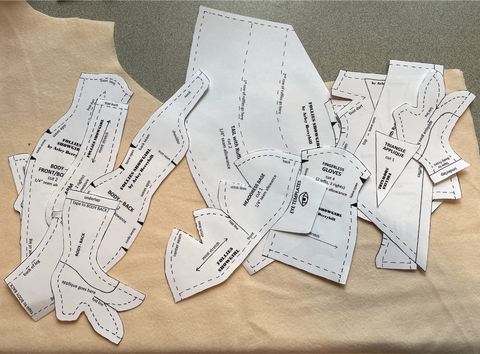
I chose this pattern for the shape of the actual doll, the size and shape and such. I created my own costuming based on photos.
Oooh, and one thing to point out, this was my first chance I've had to try using deer-suede fabric and it was really amazing to work with! No it's not really made from deer if you were wondering.
This is the first pattern I've worked with where the shoes are "appliqued" onto the body pattern pieces, which works really well for this figure! It was a bit challenging because I made her shoes out of a thin leather, so I did some of the stitching by hand because my machine wouldn't make it through.


Another new thing for me is Arley included several holes from which to stuff the body - there were several in the side seams as well as the back, which made it a lot easier to get into all the little nooks and crannies!


I should also note, this doll has a wire armature, it gets inserted first and then you stuff around the wire - I think that's also why he included so many stuffing holes, it made it much easier to keep the wire centred while stuffing. I used washed sheep wool for stuffing, it's really become my new favourite stuffing material! It is so much easier to work with than polyfil, has a nice density and a bit of weight to it as well which really helps lend a quality feel to finished pieces! I like that my stuffing tool doesn't blow through it like it does with polyfil, much less frustrating.
From here, the pattern takes you to the hands, which are always so challenging with dolls because they're so tiny! I have my go-to pattern & process but I wanted to give this one a try..


And yes, that's a wee little dart in each hand (yikes!). But you know what? I NAILED it! I always blow through the seams when I try to turn little fingers, but I used my little turning tubes and realized between the tightly knit fabric, the small stitching and the excess fabric cut off at the finger tips (you see how I cut REALLY close to my stitch line in the second photo above), all very much helped! Except for one thing..


I inserted the pipe cleaners into the fingers, everything was looking great..until I realized just how GIANT her hands were! It's hard to tell from the photo but they were massive, I'm not sure if I printed the pattern incorrectly or if it was an error in the pattern but regardless I now have a gorgeous set of hands for a large upcoming Santa doll! I could have re-sized the pattern and given it another try, however I knew those little fingers were about the tiniest I would be able to turn, so I went back to my faithful hand pattern, sized it to Lady Tinkerton and moved on..

And you can see from this photo how big a size difference there was in the end! If I were to use this pattern again, I would use "my" version of hands, and connect them directly to the arms instead of having them as a separate piece to sew on.
For this figure it worked just fine because she wears fingerless gloves which hides the wrist seam, but because my hand pattern is less complex, I think I could make it a single pattern piece.

The head pieces are my favourite type, in that they are designed to sew on the line. This is a great technique to use when you're working with very detailed parts such as the face profile (nose, mouth, chin) or little fingers. It can be confusing when you're used to working with commercial patterns but the reason we do it like this is it really makes your stitching far more exact when you follow the line exactly.

This is where it gets REALLY fun for me, I thoroughly love doing faces! I know, it's challenging, it can be disheartening when you mess it up, but generally anything is fixable, at least from a good pattern! Yes, it looks like I'm performing voodoo on Lady Tinkerton but rest assured, those pins are pattern markings that are a great way to measure and find symmetry in the facial features! One piece of advice I have for faces is to not be afraid to erase your lines, and remember to look at it "head on", because you may be working with the head being held at an angle and before you know it, all of the features are skewed! That has happened to me more than I'd like to admit! I dearly love painted facial features because again they leave a lot of room to correct errors. You can always go over your mistakes with more paint :)


You can see above where I misunderstood the instructions and had to go OVER the upper eyelid with light flesh-toned paint to match the fabric (I accidentally filled in the entire area with white). No big deal, by the time I painted in the other facial features, you can't even tell I made a mistake! I really liked the detailed instructions for how to apply her "makeup", and with this figure, I thought it would work well to stay in the browns/shimmery golds and coppers for the eye shadow. I used a bit of brown and black gel pen to finish off the really fine details (I like working with Sakura Gelly Roller Pens), and that little eye glint was also done with a pen.
The last step was to finish her face off with some blush, and again there was a

very good tip in the pattern. Using a q-tip to apply the blush! I usually use my baby finger to do this part, but with a small doll head like this, using a q-tip offered better control, and made me really feel like I was getting the make-up nicely worked into the fabric!
I ended up going over most of her face with a very light blush and then deeper coloured in the cheeks. I think it just softened everything and made the features really come together!
I attached her arms just with a needle and thread and then moved onto her skirt. It was a double layer, well draping skirt from the photos, so I needed a fabric that hung heavy but was lightweight and had some transparency to it. I also picked up a nice red fabric again with good drape and lightweight. The skirt was straight forward, I cut a rectangle, double layered it and just gathered at the waist!


I tried to match the length to roughly what I saw in the photo. At this point Lady Tinkerton is still headless! I wanted to wait until I fashioned her shirt before the head would be sewn into place.
For the shirt, I used my trusty paper towel and a draping method to create a simple sleeveless shirt pattern. I did make a muslin first but I didn't need to correct the pattern, I was quite happy with it!


 o I ended up spritzing and steaming it using my iron, and kind of rolling it around a marker to get some kind of natural waves to it. Wow, it worked! I ended up taking shorter lengths of wefts and pre-curled them and then her hair started looking more natural. Phew!

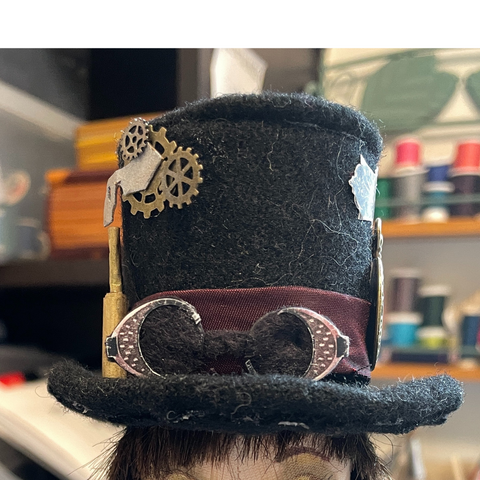
 As you can see from this angle, there was some piston thing with a metal top and it was sitting on top of a collection of gears. I had gears on hand, but to make this weird piston thing, I turned to cardstock and spray paint.


 From here I end up fine tuning the glasses, sometimes they need to be wider at the nose, sometimes they need to be wider at the temple. I try them on the doll several times at this stage to make sure I like the fit. The last thing is always to trim the arms, but I save that for the very end.
 s Lady Tinkerton so far, and I'm loving how she's coming along! The last item is her goggles for her hat, and then her stand.

 For the stand, I bought one of those wooden plaques you can get at the dollar store or Michaels (it's what I use for all of my stands). Since Lady Tinkerton was designed with two internal wires coming out of her feet for mounting, I was hoping I wouldn't have to add a visible support dowel. It could be that the wire I used should have been a thicker gauge, but simply drilling holes for those two foot wires was not going to be enough to keep her sturdy. So in the end I added a third drilled hole for the supporting dowel. I always finish off my stands by polishing them with brown shoe polish, if I start to plan ahead better, I really should be staining them, they would look so much better (adding it to the really long list of things to do LOL).
