

Jeannie B. Art Doll
Jeanie B Art Doll : The moment I saw this pattern for sale on Etsy I HAD TO BUY IT. It is a gorgeous art doll, and this was my first attempt at making one! This button will link you to where to purchase the pattern and instructions from Cloth Doll Patterns. My Art Doll Journey with Jeanie B is more or less a diary of her creation. Often patterns and instructions are open to interpretation, sometimes we nail it, sometimes not so much – this is my compilation of notes, hints and tricks I made as I went along.
Jeanie B. entered my life one day surfing around on Pinterest (the only social media I truly love). I don’t know how she popped into my feed but it was love at first sight. She was definitely going to be a challenge – her creator, Sherry Goshon has some mad talent and creativity. She uses techniques I’ve never tried before, so I embarked upon my Art Doll Journey with a genuine desire to expand my skill-set and get inspired.
and BOY does Jeanie B. ever do that!!!
Here is a link to the pattern and instructions on Etsy
https://www.etsy.com/ca/listing/263037846/sg245e-jeanie-b-pdf-doll-pattern
After downloading the pattern, I did find the instructions were minimalistic to say the least! I don’t mind hand drawn patterns at all (so long as they are fairly accurate which this one is!), but considering the detail of this pattern I had been expecting a little more in terms of photos and instructions to go on. After reading them through a couple of times I just dove in. I found the organization of the pattern itself a bit jumbled, like the completed head was first followed by the body which is backwards to me! So I did have to hop around a bit in the different pattern sections to go in an order that made sense to me.
I was thoroughly impressed with how her torso came together – considering the complexity of those little pattern pieces, the torso comes together very, very well. I used a smaller stitch than usual just to be safe. I completed the torso and the legs without too many problems. For the feet, when I boxed in the toe area I should have sewn a prominent curve. I ended up with the toes too square at the front, but that I easily remedied by going over with a needle and thread to create more of a rounded foot shape. I did not understand the instructions regarding a thread running through her arms and legs and such. I just moved on.
The head was also easy, until I got to the styrofoam part. I second guessed myself and followed the hand-sketch for placement rather than using my judgement based on the doll photos. So ultimately I located the foam lower than I would next time, but in the end it won’t really matter because it will be covered with hair!


Admittedly, I was putting off Jeanie’s arms. The fingers were just SO tiny and I knew I didn’t have the right sized turning tubes, nor the right fabric.
I managed to do the rest of the doll (head, torso and legs) using unbleached cotton sheeting, but I knew it wouldn’t have the tiny weave that would be needed to turn those little fingers. So while I pondered, I moved ahead to sculpt her head and shoes out of the paperclay!
 This part was pretty straight forward. I used the paper-clay to do a light coverage over the styrofoam, filled in the gap between the fabric head and styrofoam, and used it to gently transition between the two. I made sure to have a bowl of water handy and got it as smooth as I could, knowing that it will be covered with “hair” in the end.

I tackled her shoes next. Admittedly, I didn’t understand the corsage pin instructions, and realized at this point that I was missing something because there’s no way Jeanie is going to stand up on her own.
It’s not a big deal, I’ll get her a little doll stand or something, but this part of the instructions could have been a bit more clear. I did the shoes in two stages – I did a thin layer of paperclay around the feet along with the upper top of the boot, trying to make it as “boot-like” a shape as possible. I let that dry and then added a heel and more width to the front part of each shoe – I was after the “character” of Jeanie’s shoes, lol.

I now moved back to Jeanie’s arms. I tried several fabrics – the pattern does specify deer suede for the body, but I didn’t have any so I chose a few to try and see if they could work with the turning tubes.
Turning tubes, now those were tricky. I couldn’t find a set of fine doll turning tubes up here in Canada, and shipping from the US was going to be PRICEY. Sooo…I made my own! I found some brass pins and tubes of varying sizes and my husband helped me cut them down to appropriate lengths.

Armed with my new petite turning tubes, I tried several fabrics and I wish I could tell you which one actually worked but it was a scrap from my craft room and I think I just got lucky LOL! I first traced the pattern outline using a blue water soluble marker, sewed just inside the line (this takes some skill using the sewing machine and patience!). Oh, and I used the finest stitch my machine could do.
I used a hint I found on another blog (I can’t remember where), the girl used fray check on all of her finger seams to help strengthen them. I did that as well, however I forgot to take my blue marker off before-hand LOL. SO my Jeanie has blue fingers but I plan on going over her hands with the white gesso which should cover this up!
Another hint I came across was to turn each of the little fingers first, BEFORE turning out the whole arm. Use tubes that are the maximum you can get into her little fingers, and trim very close to the same all around the fingers – these tips all help.

Upon turning out the hands, the instructions say to use pipe cleaners in each finger for stuffing. I used cotton pipe cleaners (not chenille stems) because they are sturdier and I knew would work better for me. I cut the stems long enough that they would reach from the tip of the finger through to the wrist. I inserted each pipe cleaner into each finger. Afterwards I twisted them together at the wrist and gently stuffed around. I mostly stuffed under the pipe cleaners on the palm side, I didn’t bother wrapping with the floral tape, I think they look fine without. I then inserted a 6″ long cotton pipe cleaner and stuffed up the arm around it. I thought that would help with positioning the arm afterwards.

I didn’t understand how to attach the arms but I did understand it was important to be able to have them pivot at the shoulder joint. So I went in with a big needle in the center, through the torso and the other arm, and back through to have it all attached. It’s not as nicely finished as the original, but I honestly couldn’t figure it out..
Needle Sculpting the Breasts: I followed along the diagram in the pattern and it was pretty easy.
- Enter from the back with a long needle above the dart intersection.
- Push the needle back through to the back under the dart intersection.
- Pull thread tight at the back to give a nice shape at the front. Knot off tightly.
- Enter with fresh thread from back to front, through the hole you made in step 2.
- Leave the thread loose, enter with the needle through the side underarm, exit out the centre back.
- As you pull tightly at the threads at the centre back, note the curvature you’re creating at the front as you tighten the thread. When you’re satisfied tie off tightly at the rear. I continued the white gesso down over her breasts and her upper back.


Next, I painted Jeanie’s legs and shoes. I used a mix of Deep Midnight Blue and Ocean Blue (both were the brand Americana Acrylic Paint from Michaels. When that was dry I used a pencil to draw tick marks where I wanted to make the stripes on her leggings. I followed up carefully with a black sharpie.
For her shoes, I first painted them using Raw Umber (Americana Acrylic paint) and once that was dry I went over it with a layer of acrylic gold paint (the brand was Craftsmart from Michaels).

So at this point I had to take a bit of a breather because I was waiting on the decoupage paper I had purchased online for her bodice, my watercolour pencil crayons haven’t even SHIPPED yet (I bought all the recommended colours for the face), and I couldn’t decide which fabric to use for her dress!
Finally, my decoupage paper arrived yesterday from Ninny’s Napkins (NOT her fault, we are in the throes of Covid right now, the entire mail system is slow, and I was impatient). I had ordered two designs but I ended up going with my first choice on Jeanie, a decoupage paper from Italy called Queen Blue Harlequin rice paper A4 size – and believe me, you don’t want anything less than an A4 size because I used almost all of it! Isn’t it pretty?
I have never decoupaged before. The lessons I learned are, rice paper tears with very frayed edges which if there’s too much fray you can lose more of your pattern. When I applied the Modge Podge first to the body, I made it a thicker layer, then went over the top with much less – I felt it preserved the colours of my rice paper better. I also realized tearing at the top of the bodice left a very messy edge, so I went back over it with small pieces of paper, folded in a straight line to get a nice edge. I did that the same way around the bottoms of her bloomers. Do you see that little tiny piece of paper in the last photo beside her? That literally was ALL I had left over from my A4 piece!!


The Modge Podge dried pretty quickly. I don’t have any lace yet to detail her bloomers and bodice, but I figure I can do that a little bit later.
I went over her centre bodice with my gold paint to create her faux bustier, but realized my gold was too “bright”. So I made a mix of the gold and the Raw Umber acrylic paints and came up with a colour that matched everything else. Once that had dried I could make her corset strings.


Jeanie’s hat was up next. I cut out the three pieces and this was pretty straight forward but a side note is the pieces don’t fit super well together. So I used the top circle and the bottom “donut” circles as my absolute guides. I figured if folding the rectangle into a cyliner to build the hat sides could match up in diameter to both of these, AND have roughly the same height all around, I could just cut away any extra poster board. It worked pretty well! I used masking tape to hold it together as I fiddled, and when I was happy with the shape, I followed up with some glue gunning.
Notice how the hat grows in diameter towards the top? That’s the important part and what makes the hat have character!


Next step is to paint the hat. I used a mix of gold and raw umber as I did with the shoes, it took two coats to really get it covered. I also painted it on the inside.
I added a strip of fabric for the hat band, feathers and a bow.


With the hat complete, I went back to the sleeves. They were straight forward, and afterwards I added the lace trim to the upper part of the bodice and bloomers. I added the corset strings, I had a really hard time with just using a straight needle as I got closer to the chest. I found switching to a curved needle helped a ton and made the job really easy! I used DMC930 floss, 3 strands. I also found it helped to pre-poke the locations where I was going to insert the floss with a larger needle.


Since I’m still waiting for my watercolour pencils, I moved onto the skirt! It was very straightforward, until I got to what looked like the simplest part; gathering the upper skirt. I don’t know if it’s the cotton fabrics I chose, or I misunderstood very easy directions, but I could NOT get this skirt gathered, it was just too big for the tiny little waist! I tried a running stitch by hand, running stitch by machine, I tried gathering it then going over it with the serger (I broke 3 needles through all of this because the gathered section ends up SOO thick!
Another instruction said to glue the skirt on upside down then flip it out to give it shape. This was definitely not happening – I couldn’t get the glue to stick (I tried two kinds) and it was going to be way too much poof. I was mystified.
Finally my husband (who does not sew) suggested I run an elastic across the top to address the gathering issues. Brilliant! So I took out all of my messy work, ran an elastic across the top on my B-side, but it didn’t gather it nearly enough. So I decided on top of the elastic, to then do a running stitch (out of a double layer of upholstery thread this time).
I then cut a 2″ wide piece, then length of her waist and 2″ wide and turned it into a piece of bias tape with my iron. I used the running stitches to adjust the width of the skirt to exactly match the band, and pinned it in place. I then sewed the bias in place by hand (there was no way my machine was making it through that thickness!).


If I were to make this again, I would use this same method, but I would flip the skirt in the front a little bit to have my B-side fabric show like in the instruction photos before I sewed on the bias tape. I also made mine a tiny bit too short, but I plan to cover the gap with a cute button so not a big deal!
I then took some tacky glue and section by section, I glued the skirt at the waist to the body, along the lower bodice line. I used a couple of pins to secure it, I only glued about an inch at a time and really let it dry before removing the pins. It really adhered well!


My watercolour pencils arrived!! A 3 week covid delay, but now I could finally start on her face. I printed out the instructions for that part and kind of followed them along with having the image pulled up on my screen. This is where I wish I’d chosen a smoother fabric for the body (I had just used cotton sheeting), as it was challenging to work with the pencils. Next time I’d like to try the same fabric I used for her hands. I bought a matte sealant spray from Michaels and gave her face a spray as the pattern suggested.


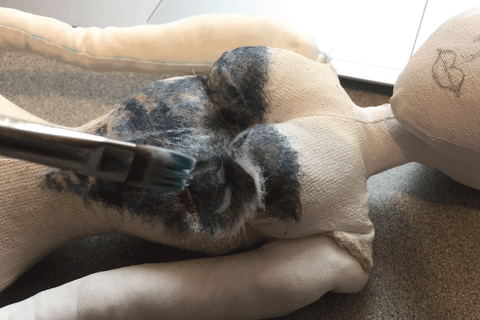
This is about the time I realized I forgot completely about Jeanie’s ears! It wasn’t necessarily a bad thing though, I found it easy to place them and get an appropriate size with her face complete then if I had done it with just the sketched face. I let them dry and painted with gesso to match the rest of her head. After that I finally moved onto the wig. You need two measurements – the first one is behind the ears as shown, this gives you the length. The second measurement gives you how wide the fur should be – it’s from the front of the forehead to the back o the crown, a half-circle measurement. So I ended up with 18cm for my length and my width was 7.5cm. Yours should be close to those.


I folded over the one side and used quilting clips to hold it in place until it dried – that’s the side that will sit around the hair-line. I sewed along the short side to create a tube, then tucked the long fur hairs inside before doing the running stitch around the raw side, pulling tight and knotting. When you flip this right-side out, it’s a wig! And it honestly fit AMAZING – like a glove!


At this point I went back and put on her neck strap – I just hot glued it at either end underneath her armpits. Then I moved onto her bustle – this was straight forward but there was no measurement for the “circle”. I used a 12cm circumference circle (I found a plastic lid that was that size and traced it onto the fabric. Other than that I followed the directions along, I used hot glue to fix the gathered rectangle to the “pouff” about halfway up, where it looked good


I hot glued the bustle in place at the back. I went back and made a little button to cover the gap at the front of her skirt and glued it into place. Her hat was also just hot glued in a few spots and put in place.


Voila! Well, that was really a FUN pattern to work through and I learned a LOT. I’ve never used fur for the hair, I’ve never used watercolour pencils for the face, turning tiny fingers was new to me – decoupage, working with clay and fabric simultaneously – it really was an eye opener! I will definitely be revisiting this pattern and try another version – same figure but different clothing, face style, etc.
The only thing left, since I wasn’t able to make her stand up on her own is to make her a little doll stand. My husband Jerome is going to help me with that and I will post about it when we finish it. It will involve wooden dowels and wood bases I found at the dollar store. I’m hoping what we come up with I can use for future dolls.
I really hope I’ve inspired you to download Sherry Goshon’s pattern and make your very own Jeanie B.